Why I'm Writing This:
In my book, Learn to Program 2D Games in Blitz Basic, Chapter 20, I talk about moving sprites around on a tiled map. There is collision against the map, bounding boxes, etc.
I've received a few emails over the last year critiquing the technique that I was using to handle that stuff. The critics were right. The technique that I used was meant to be a catch-all, covering the various types of scrolling and such. Unfortunately, one often finds that writing a catchall doesn't always turn out the way you'd expect. In this case there were little annoyances that I thought wouldn't be such a big deal, but they kinda are. The screen will scroll to a point that is beyond the edge on occassion, and it even seems that the sprite itself will act erratically under certain circumstances. Now, I would love to chalk this up as being a little fun A.I. that I included in, but alas I'm not bright enough to pull that off.
This tutorial is more of a "DO THIS INSTEAD OF THAT," a replacement for some of the code-base and description of Chapter 20, and for those of you who don't have the book it's a taste of what's in there. I know that it's not exactly the best marketing angle to say "here's a whole tutorial on how I screwed up in my book," but the information needs to be updated and as potential purchasers you at least know that I work to update things that are wrong in my writing.
Do note that a lot of this text and the images associated are snagged directly from the book. I've already spoken with Idigicon on the point and we're all okay with that.
Also note that I'm only going to be covering what I call "Edge Independent Scrolling" here. That means that the map will only scroll until the player gets to a point where the sprite can move independently of the map. Details to follow.
Introduction:
When you’re moving your player’s image (often referred to as a sprite) around on your tiled map, you’ll certainly going to want some objects to block paths. Maybe the player can’t cross the water, or there are walls in the way, etc. Whatever you choose, there must be a way to prohibit the player from crossing certain boundaries.
Additionally, if you have a large map, you should be able to have the character move around the entire map. You need to be a little careful here because of visual aesthetics. If you let the player run to the edge of the screen before you begin scrolling, the player won’t have the advantage of seeing what’s coming up.
Most side-scrolling games handle this by making the player’s character sit in the dead center of the screen until that player hits an edge of the map. From this point, there are a couple of ways to handle what happens.
1) Instead of continuing to scroll the map, the player’s sprite will now have the ability to move away from the center of the screen until such time that the screen can again scroll.
2) There is a static backdrop so the map doesn’t look odd having its edge sitting in the center of the screen.
We're going to deal with the first one in this tutorial.
NOTE: All of the routines in here rely on the map functions discussed in Chapter 19 of the book. The library is included in the demo of this source though, and it's fully commented.
Player hits a wall
There are a number of ways to handle collision checks on walls and other impassable objects. Here are a few:
1) Array-based checks: Since each tile is an element of an array (at least in the examples provided in this book), you can find out whether or not your player’s next move will cause him/her to spill over to a tile that is a wall.
2) Pixel-based checks: You can use the IMAGESCOLLIDE command to see if your player is literally hitting a wall.
3) Box-based checks: You can set up specific depths that your character can overlap a wall before a collision is triggered.
I like the third option for 2D because it allows the most flexibility, so that’s what I’m going to demonstrate here. Keep in mind that I’m talking about the player overlaying the tiles and such, not bullet collisions. That’s a totally different thing altogether.
Here is a visual idea of what we’ll be doing. In figure 1 we have our Swashbuckler surrounded by a bounding box:
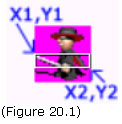
Look carefully at the above graphic. We have a swashbuckler with a box around his mid-section. This box is not really in the sprite graphic, of course, it’s just to give you an idea of what a bounding box is. In reality, all we really want to know for the bounding box is what the X1, Y1, X2, Y2 values are for the box. We’re not even going to compare the actual sprite image to the wall image at all!
What we’re going to do is find out where the player’s sprite is on the screen and from there use basic math and IF…THEN…ENDIF statements to determine if there is an overlap. So again, the box shown in that graphic is only to convey the concept.
By using this method of collision detection, we have much more control over how much to overlap our walls. Here’s an idea of what that would look like:

See how the sprite overlays the wall up to the top of the bounding-box shown in Figure 20.1? If we instead went with a method that checked the entire player, we would get something more like this:

Since the top of the character hits the bottom of the wall, there would be a collision, and that doesn’t look nearly as nice.
In order to handle this type of collision checking effectively, we’ll need four total boxes for the character: top, bottom, left, and right. I’m going to use an array to do this.
Our sprite image is 32x32, which is why the numbers you see are 32 or less. Now you could certainly compare outside of the image space if you wanted to.
I’ve also set up a little function that initializes the bounding boxes for the sprite. You can alter the little numbers as you see fit.
Now, you know that you can't put carraige returns in Blitz Code. This is displayed this way to make it easier to read.
For our example, I would call the above function as follows:
Next we’ll want to run through our map and setup the walls. First we’ll setup a TYPE to hold them all.
Next we’ll call our AddWall function that actually populates the TYPE. To do this you need to know the actual numbers for your walls, of course.
It’s important that you keep the X and Y values updating accordingly in this function, as these values will designate where your walls are on the map.
I wrote up a little function that calls Map_AddWall with all the pertinent numbers so I could keep the function as encapsulated as possible.
Now that we have our walls in place and accounted for, we just need a function that compares where the player’s sprite is in relation to them. If any of the areas overlap, we simply stop the player’s movement. The following function returns a value of 1 if an overlap is detected, and a value of 0 if there is no overlap.
Screen and World Coordinates:
The concept of screen and world coordinates can be tricky, so let’s cover that first.
Screen coordinates are where on the screen the player (or some other object) will be displayed.
World coordinates denote the X, Y position the player is in the world. So while the player may be sitting in the center of the screen, he may be near the bottom right of a big map. This is important because the map location of the player will indicate what tiles are shown, where the enemies or traps are, etc.
Imagine that we have a map that is 100 tiles wide by 100 tiles tall. Each tile is 32x32, so in essence we have a map that is 3200 pixels by 3200 pixels, right? Now the section of the screen we’re going to use to display the map (known as a “view port”) is 20 wide by 15 high. Taking our 32x32 images, this means that we’ll only be seeing 640 pixels on the X-axis and 480 pixels on the Y-axis. Knowing this, we need a way in which to display the rest of the pixels as we move across the map. Since we are starting off at pixel 0,0, we know that one move to the right would put us at pixel 1,0. But if we move the player along with the pixel movement, the player’s sprite will soon leave the screen.
So instead, we use two coordinates. To determine which tiles of the map, which bad guys or NPC (non-player characters), etc., are drawn, we use the world coordinates. To actually draw the player and the currently visible map tiles we use the screen coordinates. There is a little bit of calculation involved to get this all to work. First, though, let’s talk about the concept behind scrolling a map.
Scrolling a Map (Theory):
I once had tons of trouble understanding the concept behind how a map scrolls, but then I read an explanation that made it all fall together. I’ll try to re-tell that here!
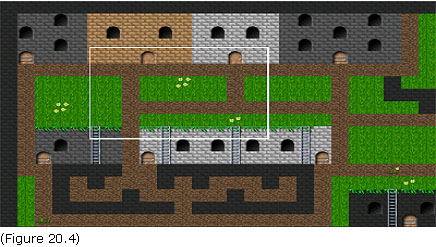
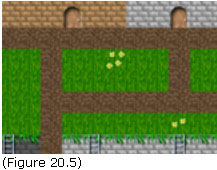
The white box in Figure 20.1 is to denote the view port area. This is the area we are going to actually display to the user. The upper left corner of the map is 0,0, but the upper left corner of the view port (white box) is 83,60. This means that our world coordinate is 83,60. Let’s say that our view port’s top left position is 10,10. This way we can have menus, title bars, heads-up-display (also known as HUD), chat, etc. So the actual view port will show this:
Now all you have to do is imagine moving that white box around pixel-by-pixel (or 4 pixels or whatever), redrawing the view port data from the new world coordinates, and bam…you have the concept of 2D map scrolling under your hat! Hopefully that will also help you to better understand the screen and world coordinate concept.
Edge Independent Scrolling:
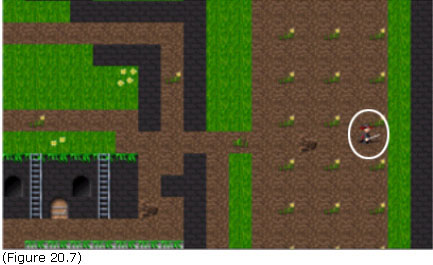
Edge Independent Scrolling is a term that I made up (I think). The object is to scroll the map only until the player reaches a point in the world where the edge is at the side of the view port. From here the player moves independently of the map.
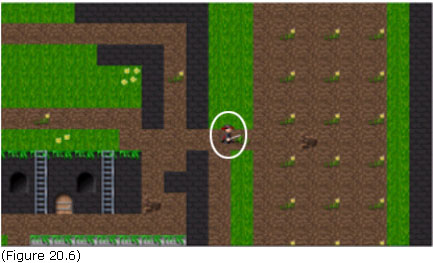
Here we see our player is sitting in the center of the view port, but we can see the edge of the map. So what happens when the player moves to the right?
Notice that the map has not changed, but the player’s position has. The map edges used to move all the way to the player, but now when the player reaches an edge, the map stays put and the player will move instead. Here is another view to demonstrate this:
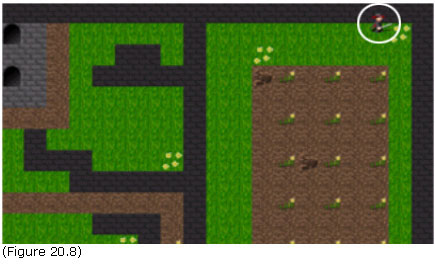
See how the player is now in the upper-right and not in the center? This is the concept that I’m trying to get across.
When the player gets back to a point that he’s crossing the center of the screen, from either the X-axis or the Y-axis, the map will scroll accordingly.
Scrolling Code:
The following code pieces are brand new, but they need a little description and theory talk.
First off, there is more than one way to scroll a map. The method I'm going to present is pretty simple (in my opinion) and it runs at a nice speed.
The basic theory goes something like this:
1) We have a tile size, in this case it's 32x32.
2) We want to scroll the map at a certain speed. I use 4 pixels per step. You can easily change this to whatever you want, but this code will assume that you are using a value that's evenly divisible into 32. Feel free to alter the code to your heart's content, of course.
3) Each step that the player makes will change an offset value based on the distance of each step. So, if we just launched the game, the XOffset value would be a whopping 0. One step to the right and it becomes -4. Why MINUS? Because we want that left-most tile to start displaying at -4 now. This will make the tile display partially outside of the viewport.
4) We display all the tiles in the viewport + 1. Huh? In other words, if we only display the exact number of tiles that the viewport will hold, we'll see the right-most column be nothing but empty space until we clear the left most tile completely. We don't want that. So where the viewport may hold exactly 20 tiles, we want to DRAW 21. Don't worry, Blitz will automagically clip the tiles.
5) Update the WorldX and WorldY coordinates of the player to keep track where he is. This is important because we're going to be checking the WorldX, WorldY values for collisions. We don't check the ScreenX and ScreenY for this because they don't change.
6) If we register a collision, no biggie, just reset the World value back to what it was before we moved a step.
That's pretty much it.
Here's the Move Player code for review:
Note that the above code is in our main "test.bb" program, not the "maplib.bb" one. This is because how we move the player is up to us, not up to a module.
Here is the set of calls made that setup scrolling:
You can see that I'm showing the map in all instances. If I didn't, we'd see sporadic blank screens with our little masked hero on them. A sort of pergatory, if you will. But it's not always scrolling so we need to make sure to layout the Map_ShowMap function to handle that.
That's the header for the function. Notice that if you send 0 for direction that the map will simply display, not move.
Now here's the full source for that function:
Lot's in there, I know. Hopefully the comments and a little study will help you through that though.
Conclusion:
I know that's a lot to pickup if you're new to Blitz, which is why that's Chapter 20 of the book, and not Chapter 2. :)
Please note that in the attached files I've included complete source and assets to see this in action. Modify however you wish and do whatever you want with the code.
Click Here for the files.
All the best!
-Krylar
Krylar's Kreations is a division of 1338 Enterprises, Inc.